Hey everybody!
I am asked by clients/team members/friends a lot about how to setup TEMPDB to use the D:\ drive on an Azure VM for SQL Server. Following the steps listed below is how I configure it on my VM’s. This seems to be the most standard way folks are doing it. However, this is not always the best practice to do. The reason being is that the drive size varies depending on the VM size you choose.
Read the section “Temporary Disk” first, then decide on where to place your TempDB.
Temporary disk – AKA D:\ on Azure VM’s
Remember, this disk is as the title of this section says…TEMPORARY! Do NOT put ANYTHING on this drive you cannot afford to lose. Don’t say nobody warned you either, because the drive itself contains a nice little txt file warning you, here is the EXACT text:
WARNING : THIS IS A TEMPORARY DISK.
Any data stored on this drive is SUBJECT TO LOSS and THERE IS NO WAY TO RECOVER IT.
Please do not use this disk for storing any personal or application data.
For additional details please refer to the MSDN documentation at : http://msdn.microsoft.com/en-us/library/windowsazure/jj672979.aspx
The temporary storage drive, labeled as the D: drive, is NOT persisted to Azure blob storage. Do NOTstore your user database files or user transaction log files on the D: drive.
For D-series, Dv2-series, and G-series VMs, the temporary drive on these VMs is SSD-based. If your workload makes heavy use of TempDB (e.g. for temporary objects or complex joins), storing TempDB on the D drive could result in higher TempDB throughput and lower TempDB latency.
For VMs that support Premium Storage (DS-series, DSv2-series, and GS-series), we recommend storing TempDB on a disk that supports Premium Storage with read caching enabled. There is one exception to this recommendation; if your TempDB usage is write-intensive, you can achieve higher performance by storing TempDB on the local D drive, which is also SSD-based on these machine sizes.
Configure SQL Server to Use Local SSD
- Connect to your VM in Azure.
- Create a new directory in the root of the D: drive called SQLTEMP (You have to create a folder as you will not have permissions to write directly to the root of D:\)
- Launch SQL Server Management Studio and connect to the SQL instance.
- Launch a new query window by clicking the New Query button.
- Configure the tempdb system database to store data and log files on the D: drive. Cut and paste the following code into the query window then click the execute button.
USE MASTER
GO
ALTER DATABASE tempdb MODIFY FILE (NAME= tempdev, FILENAME= ‘D:\SQLTEMP\tempdb.mdf’)
GO
ALTER DATABASE tempdb MODIFY FILE (name = templog, filename = ‘D:\SQLTEMP\templog.ldf’)
GO
6. In Management Studio, right click the server icon and choose Restart. Click the Yes button on each of the confirmation popups.
7. In File Explorer, navigate to the D:\SQLTEMP directory you created earlier. You should now see two files for tempdb in the folder.
Configure Windows Server Startup to Prepare the SSD
- In File Explorer, create a new folder here: C:\SQLServerFiles\TEMPDBSetup
- Copy and paste the following code into a new file and save the file to
C:\SQLServerFiles\TEMPDBSetup\SQLTEMPDBInit.ps1.
$SQLService="SQL Server (MSSQLSERVER)"
$SQLAgentService="SQL Server Agent (MSSQLSERVER)"
$tempfolder="D:\SQLTEMP"
if (!(test-path -path $tempfolder)) { `
    New-Item -ItemType directory -Path $tempfolder `
}
Start-Service $SQLService
Start-Service $SQLAgentService
- Launch PowerShell as Administrator. Run the following code to change the execution policy to RemoteSigned and type Y to confirm.
Set-ExecutionPolicy RemoteSigned
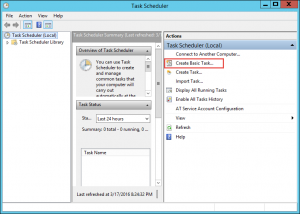
- Launch the Windows Task Scheduler by navigating to the Start screen, click Administrive Tools, then double-click Task Scheduler
- In the Task Scheduler, click Create Basic Task… on the Actions pane.
- In the Create Basic Task Wizard, type TempDBInitfor the name and click Next.
- On the Task Trigger screen, select the radio button next to When the computer starts then click Next.
- On the Action screen, select the radio button next to Start a program then click Next.
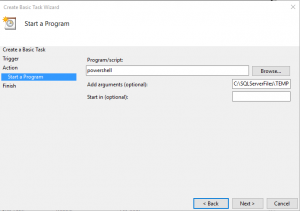
- On the Start a program screen, type powershellfor the Program/script and -file “C:\SQLServerFiles\TEMPDBSetup\SQLTEMPDBInit.ps1″ for the Add arguments then click Next.
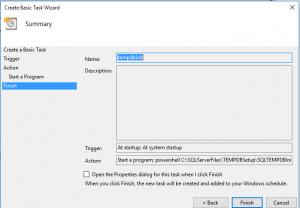
- On the summary page, check the box next to Open the Properties dialog for this task when I click Finish and click Finish.
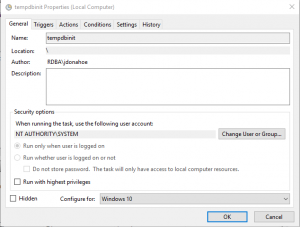
- On the Properties screen, click the Change User or Groupbutton and type SYSTEM for the name and click OK, change Configure for to Windows Server 2016. Click OK to save the changes.
- In the Task Scheduler, click on Task Scheduler (Local), then scroll down to Active Tasks and verify that your task was created and activated then close the Task Manager.
![]()
- Open the Services Snap-in by going to Start > and typing: Services.msc
- Right-Click on your SQL Server(Instance Name) service.
- Go to properties and left click.
- Change the startup type to: Automatic(Delayed Start).
Test your Configuration
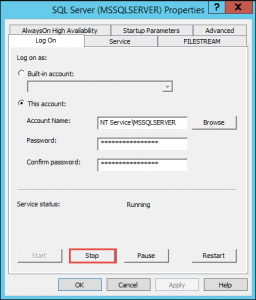
- From the SQL Server Configuration Manager, stop both the SQL Server and the SQL Server Agent.
- Navigate to the root of the D: drive and delete the SQLTEMP folder.

- Restart Windows by right-clicking the Windows Start button and clicking Restart
- Give the virtual machine about five minutes to restart then log back in.
- Navigate back to the D: drive and verify that your SQLTEMP directory was recreated.
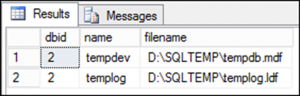
- Open SQL Server Management Studio and execute the following query to verify that tempdb is running with files located on the D: drive.
SELECT dbid, name, filename FROM sys.sysaltfiles WHERE dbid = 2
If SQL Server is configured correctly your output should look like this:
Thanks for reading everybody!