You’ve probably heard the latest news in the SharePoint world: SharePoint 2013 has been released to manufacturing (RTM)! We’ve been told that SharePoint 2013 should start to appear “in the wild” starting sometime in November, and I expect that the amount of tinkering by enthusiasts with both the public preview release and the soon-to-be-available production release is only going to increase in the weeks and months ahead.
New releases of SharePoint usually entail moving databases between production farms and test environments constructed with the newer version of SharePoint. Since SharePoint 2013 only supports database-attach upgrades, it seemed like a good time to cover some of the concerns associated with moving content databases between SharePoint environments. This may help some of you who are new to SharePoint; for the rest of us, it is (hopefully) good refresher material.
Doing the Database Shuffle
Moving content databases between SharePoint farms happens more often than you might think. Sure, it happens in the aforementioned SharePoint version upgrade scenario, but it probably happens even more often in cases where content in a development, testing, or staging environment needs to be refreshed with (current) production content.
The sequence of steps that are employed to copy content databases from a source farm to a destination farm are generally well-documented and understood. I’m going to focus on one specific scenario for the purposes of this post, though: copying databases to an environment where those databases don’t yet exist.
In this type of “first-time copy” scenario, the following set of steps is pretty common:
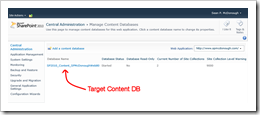
1. A content database is identified for copy purposes. For new administrators, identification of a target content database is typically achieved by going into the SharePoint Central Administration site. The Manage Content Databases page (as shown on the right) makes it easy to determine the identify of a content database that is associated with a target Web application.
2. A backup (.BAK file) of the content database is created in the source environment using SQL Server’s built-in backup mechanism. Alternatively, a database detach – followed by a copy of any .MDF and .LDF files associated with the database – may be performed.
3. The backup (.BAK) or detached database file set (.MDF and .LDF) is copied from the source environment to the destination environment.
4. In the destination environment, a restore is performed (in the case of a .BAK file) or the database files are attached (in the case of .MDF and .LDF files) to SQL Server.
5. The SharePoint content database, which is now available in SQL Server, is attached to a Web application that has been created in the destination environment/farm.
What Could Possibly Go Wrong?
Step #5 in the previous sequence is where the frustration starts for many new and accidental SharePoint administrators. Why is that the case? Well, seasoned SharePoint administrators know that the “right” (or at least “easiest”) way to mount a content database is to drop down into the SharePoint Management Console (PowerShell) and issue a Mount-SPContentDatabase command, such as
Mount-SPContentDatabase –Name SP2010_Content_SPMcDonoughWeb80 –WebApplication http://spdev:18580/

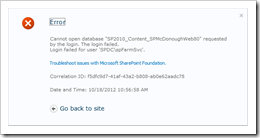
Cannot open database “xxx” requested by the login. The login failed. Login Failed for user ‘yyy’.
If you hadn’t seen this type of exception before trying to add the content database, you might spend an awful lot of time trying to figure out where to go next. In SharePoint 2010, no real “next step” help is provided. As it turns out, the solution to this problem is simple: use the Mount-SPContentDatabase cmdlet instead of Central Administration’s Manage Content Databases page.
Why Does This Happen?
When in doubt, blame it on permissions. That usually turns out to be a safe bet with SharePoint. In this case, it’s also accurate.
When a content database is joined to a farm and in normal, everyday use, there are always at least two accounts that have some form of access (typically as a SQL Server db_owner) to it:
- Application Pool Account. The account context that is assigned to the IIS application pool within which the associated Web application runs. Normal user read/write operations take place through this security context.
- Farm Service Account. The account context that SharePoint’s Timer Service run under; also the account context that is assigned to actions originating from SharePoint’s Central Administration site. Non-user activity (typically for configuration and/or administrative purposes) commonly occurs through this security context.
When a content database is either restored (in the case of a backup) or attached (if it had been detached) from another farm, these two accounts in the destination farm normally don’t have the rights they require to access the database. Because of this, SharePoint can’t (initially) do anything with the databases.
The Mount-SPContentDatabase cmdlet takes care of granting the permissions SharePoint needs in order to add a content database to a Web application in the destination environment. Adding the database through the Manage Content Databases page in Central Administration may look like an operation that is equivalent to Mount-SPContentDatabase, but it’s not. Microsoft actually does spell this out, but you need to dig for the information in both the database-attach TechNet reference I supplied earlier (for SharePoint 2013) or in the equivalent reference for SharePoint 2010:
You can use either the Mount-SPContentDatabase cmdlet in Windows PowerShell or the addcontentdb Stsadm command to attach a content database to a Web application. Using the SharePoint Central Administration pages to attach a content database is not supported for upgrading.
And now for some good news: Microsoft threw new (and accidental) administrators a bone in SharePoint 2013. Attempts to add a content database that doesn’t meet the permissions requirements through Central Administration results in this sort of dialog.
The content database requires upgrade and could not be attached in this operation. Use either the [stsadm –o addcontentdb] command or [Mount-SPContentDatabase] cmdlet instead.
Woo-hoo – actual guidance to resolve the issue!
Mounted-Up but Still Locked-Out.

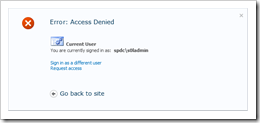
The dialog on the right is a common sight in SharePoint 2010 environments when an account lacks the permissions to access a site collection. The message displayed really doesn’t leave much to go on.
Error: Access Denied
“But wait,” you might be saying, “I’m a member of the SharePoint Farm Administrators group. I should be able to access site collections in the content database I just added.” This is a common misconception, particularly amongst newer administrators. The reality is this: unless you have rights to the content itself, Farm Administrator status doesn’t get you there.
In truth, though, being a Farm Administrator does afford you the means to grant yourself access to the content. The key to entry lies with the creation of a Web application User Policy. For content databases that have been freshly added to a “new” farm, a Web application policy is a common first step to administrative access for configuration and additional rights assignment.
How do you “let yourself in” through a Web application policy? TechNet provides you with a walk-through and some additional information, but here’s the quick-and-dirty run-down:
1. Open the Central Administration site
2. Select the Manage Web Applications link in the Quick Launch menu and navigate to the Manage web applications link that appears under the Web Applications section.
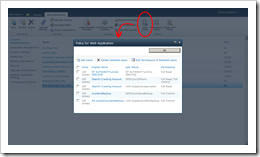
3. Select the target Web application from the list that appears, and then click the User Policy item in the ribbon.
4. A modal dialog like the one above and to the right will appear. Click the Add Users button in the modal dialog.
5. The dialog will change to permit a Web application zone selection. Unless you have a specific need to grant access through only one Web application zone, stick with the default setting of (All zones) and press the Next button.
6. In the dialog that appears next, add your name/identity to the Choose Users list. The Permissions settings are relatively self-explanatory, so choose Full Control or Full Read as appropriate. Finally, check the Account operates as System checkbox if you wish for your activities (within the Web application’s site collections) to be identified as having been carried out by the “System” account rather than through your (domain) account.
7. Click the Finish button and verify that the changes you made appear in the Web application policy list.
8. Click the OK button to close the Policy for Web Application dialog.
After creating a Web application User Policy, you should have the permissions needed to access site collections within the Web application.
If you are new to Web application User Policies, here’s an important point to note: Web application User Policies actually trump permission settings that are specified within the site collections themselves. This doesn’t come up too often with Full Control and Full Read permission policies, but it is a source of confusion (particularly for site collection administrators) when Deny Write and Deny All permission policies are in effect. If a user who is a Site Owner also happens to be identified in a Deny Write Web application User Policy, that user will be to access the site that they own … but they won’t be able to make changes (i.e., perform write activities)! Due to the potential for confusion, Web application Deny policies should be used sparingly.
To Sum It Up

I deliberately avoided talking about the other major source of trouble: the upgrade process itself. Whether you’re going from SharePoint 2010 to SharePoint 2013, SharePoint 2007 to SharePoint 2010, or simply between farm versions in SharePoint 2010, there are a whole host of additional problems you may face.
Database-attach upgrades are an art, not a science. Permissions, on the other hand, are pretty well understood for content database mounting and access. Although there isn’t much prescriptive guidance I can give on the former, I hope that after reading this you feel decently equipped (or refreshed, if you are a veteran administrator) to tackle the latter.
References and Resources
- Microsoft SharePoint Team Blog: SharePoint Reaches RTM!
- TechNet: Download Microsoft SharePoint Server 2013 Preview
- TechNet: Attach databases and upgrade to SharePoint 2013
- TechNet: Attach databases and upgrade to SharePoint 2010
- TechNet: Manage permission policies for a Web application (SharePoint Server 2010)


